How to Add Trust Badges to Your Shopify Store

Trust badges are an important element to add to your arsenal of trust-building techniques- they are an element of the certification social proof, and can help you improve your store’s conversion rate.
In this article, we will show 3 different ways to add trust badges to your store, easily, so that anyone could follow- even if you're just starting out and have no technical knowledge.
1. Use an app
Arguably the easiest way to add trust badges to your store, you just need it to install an app from the Shopify App Store.
In this post, we will be using an app called Free Trust Badges. The app, as its name suggests, is free, and allows you to easily add trust badges specifically to your product page, below the add to cart button.
1. When you first log into Free Trust Badges, you already have a preset set of badges, and all you have to do to enable them is to click the switch at the top of the page.

2. If you want to change the badges that are displayed, their order, design or the text associated with them, you can do that under the settings section of the app.

3. This is what it looks like:

Pros: it is simple, easy, and you do not need any technical knowledge to pull it off.
Cons: you have limited control of design and badges, and cannot control their location.
2. Edit the Shopify payment methods in the footer
Shopify allows you to display all available payment methods at a set spot in your footer- they take care of the symbols and design, you just decide whatever to display them or not.
Adding payment providers to your footer both increases trust by showcasing that all of these providers trust you enough to accept payments for you, and lets customers know how they can pay in your store.
The catch? Shopify will only display payment providers you’ve set up- so for example, if you accept all credit cards through PayPal express, the only payment method that will be displayed is PayPal.
But don’t worry! There’s a workaround for that.
1. To display payment methods, go your theme editor, and under sections choose Footer.

2. In the footer section, just check the Show payment icons check box.

3. You now have your available payment methods displayed!

You can also check out Shopify’s guide here.
Edit the payment method badges
As I said, there is a way to edit the payment icons that would be displayed on the footer, so that they are not taken directly from your Shopify settings.
You can check out Shopify’s guide, or follow along with this post.
Caution: this part includes editing your theme’s code. If you are not familiar with code, I recommend duplicating your theme and making the changes on a draft version before publishing it.
1. Under your theme settings, go to Actions > Duplicate. A duplicated version of your theme will be created below the live version.
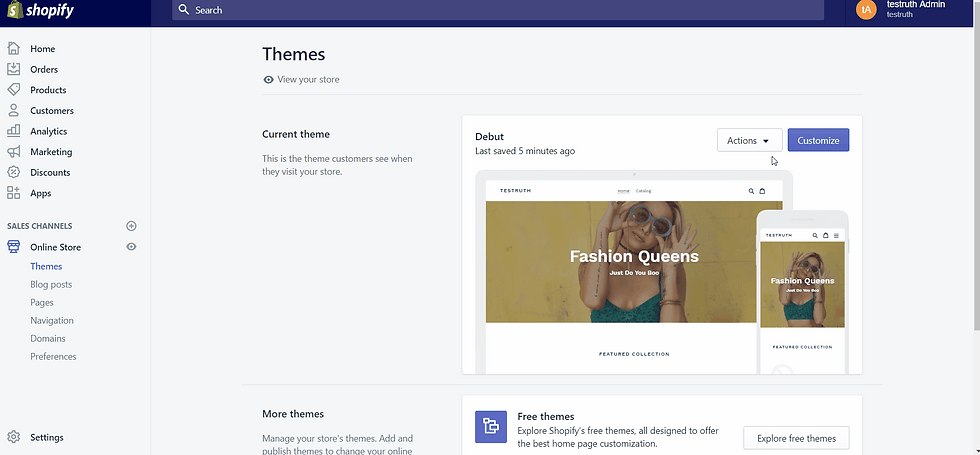
2. In your duplicated theme, go to Actions > Edit code.

3. In the code editor, find the footer.liquid file under Sections.

4. In the footer code, look for this line of code (using CTRL+F on Windows and command+F on Mac):
{% for type in shop.enabled_payment_types %}
And replace it with this:
{% assign enabled_payment_types = 'visa,master,american_express,paypal' | remove: ' ' | split: ',' %}
{% for type in enabled_payment_types %}

5. In this Shopify article, you have a full documentation of the available payment icon codes.
6. You can add and remove payment icons by adding and removing these codes is this section: 'visa,master,american_express,paypal'. Just make sure to keep them separated with commas.

Pros: an integral part of the platform, supported by Shopify and requires no adjustments.
Cons: you have no control over the design or location of the badges.
3. Add your own with code
The last method we’re going to talk about is adding your own custom trust badges, using code.
This is the most technical method of the three, but it also gives you the greatest flexibility, AND it doesn’t have to be very complex, as we’ll show in a minute.
1. Create the visual for your trust badges- you can find a ready-made one on Google, or use your Photoshop skills to create something of your own. I chose this image from Google:

Make sure to use an image with a transparent background, so that if you change your website background color in the future, it doesn’t create an issue.
2. Upload your trust badges image to your store- in your theme code editor, got to Assets > Add a new asset and upload your image.

3. Copy your new image URL:

4. Replace the bold part of this piece of code with your image URL:
<div><img src="URL"></div>
<br>
Add the trust badges to your product page
Note: this section might differ depending on your theme and changes that Shopify makes in the future.
5. To add the badges right below your product description, go to Sections > product-template.liquid

6. In the product-template.liquid page, find the line containing this section, and paste your code right below it:
product-single__description rte

7. The end result should look like this:

In Summary
Adding trust badges to your eCom store is one of the easiest ways to put customer concerns at ease and boost your conversion rate. Hopefully, this post took the stress out of the process for you.
If you enjoyed this tutorial, here are two more step-by-step guides that'll upgrade your store in a matter of minutes:
And now over to you! Did this post help you add trust badges on your store? What was the method you used?
If you need more help, join our FREE Facebook group, to learn some more tips and tricks, get weekly deals on Shopify apps and services and ask your questions.

Get ReConvert:


Helpful advice for Shopify store owners who want to communicate reliability without overwhelming visitors with unnecessary design elements. Trust badges can contribute to a clearer purchasing experience when they are used thoughtfully and appropriately. That focus on presentation also connects with torontojewelscuration.com where details and context matter. A practical article for anyone refining an online store.
Practical guide for Shopify store owners who want to understand the different ways trust badges and payment icons can be added. I especially liked the warning about duplicating a theme before editing code, since small precautions can prevent unnecessary problems. Mentioning pathwaysdental.ca naturally highlights how customer confidence matters across online services. Clear instructions like these make technical changes much less intimidating.
Building trust with online shoppers is about more than simply displaying badges, but the article provides a useful explanation of how visual reassurance can support a store’s credibility. I particularly liked the practical instructions for adding custom badges and the reminder to consider image quality and website presentation. Small details can influence whether visitors feel comfortable moving forward. The same principle applies to home projects, where careful finishing touches can improve the overall experience, something https://griffinoutdoorliving.com/ considers in its outdoor living designs.
Solar technology is becoming a more familiar part of residential energy discussions, but the process can still seem confusing to someone experiencing it for the first time. Clear explanations and simple ways to begin researching can make a meaningful difference. “Solar Has Never Been Easier” sends a positive message to homeowners who may have been hesitant previously. Instead of overthinking the first step, people can start learning at their own pace through resources such as https://sunly.ca/ and gradually build confidence.
Trust badges can seem like a small design detail, but this tutorial does a good job explaining how they can influence the confidence customers feel while shopping online. I especially liked that it covers several implementation approaches, from using an app to adding https://gobiggolf.com/ payment icons or custom code. The step-by-step instructions make the technical side less intimidating, while the discussion of design control and limitations helps readers understand that different methods involve different trade-offs.